Friday, December 28, 2012

Embedded Chart (Graph) in MS Word or PowerPoint

In this blog I aim to show you how to easily create a chart in a Word document or in PowerPoint, say for reporting or a presentation..  We will use the scenario of counting types of vehicles passing a given location over the period of a month.  We will group the vehicle type by 4x4, Lorry, Bus, Car & Motorbike.  Again, you can apply this to anything you see fit..  Most reports are in reality generated from data, the system is automated, but for a small company or individuals that have to send out a daily report and do not have the benefit of an automated system, this will work fine..  I will show how to apply charts in MS Excel soon, where is reality most data will be stored.

Section 1: Creating the Chart

  • Open a new Word document (or the current daily report) 
  • Now go to the Insert Tab & Select Chart, there are many different types of charts to choose from.  As always, I will show the basics here and let you play about to discover more.  So for this blog, I will select the Default Column Chart..
  • Once you select your chart, it will displayed on the Word document and an instance of MS Excel will open with a small table which you can adjust, as seen below:


  • The basic table has 3 columns & 4 rows of data.  We require 31 days and 5 vehicle types.  I am going to create the dates (1 - 31) in cells A2 - A32 and vehicle types in cells B1 - F1, so dates down the side and vehicles alone the top..
  • Below the table it tells you how to resize (To resize chart data range, drag lower right corner of range.)  So resize the table now by dragging the lower right corner to cell F32 & delete the resize text...  You will notice the chart has changed on the Word document.
  • Ok, now we want to name out vehicle types and show 31 days.  So along the top in B1 type 4x4, C1 - Lorry, etc to F1 - Motorbike...
  • In cell A2 type 1 & use Fill Series to auto-populate the cells to A32  (as shown in a previous blog - Filling cells quickly - Fill Series)
  • You will now see the days of the month along the bottom and the vehicle types colour coded on the right.  We have not deleted the data yet, so will show some bars in the bar chart.  Delete the data now(cells B2 - D5), and the bar chart will be clear..
  • Now add your own data for the first of the month.  Not very impressive, but don't worry as the days pass the chart will build up and be more impressive.  
  • Now, just close the Excel sheet as it is saved through Word when you save the document.
  • To edit the data, just Right Click on the Chart and select Edit Data from the popup menu.  Note that the chart type, colours and legends can all be changed anytime, so play about with it to you find something you like..
Added extra - I want to see how the chart looks fully populated, but rather than type the data for 5 vehicle types over 31 days (155 cells), I have used the RANDBETWEEN function to give me random number between 2 given numbers and pasted it into each vehicle type column..  Here are the functions:
=RANDBETWEEN(10,30)  For 4x4, you can just copy and paste =RANDBETWEEN(10,30)  into the formula bar and set your own numbers.  Remember, this is just to populate the chart (to see how it looks) before you use real data and submit the report...
=RANDBETWEEN(10,40)   Lorry
=RANDBETWEEN(20,60)   Bus
=RANDBETWEEN(55,350) Car
 =RANDBETWEEN(5,15)    Motorbike

Below is the "test" chart:

Thursday, December 27, 2012

Dates & Conditional Formatting

Okay, its been a few days since my last post..  Its Christmas holidays, but no excuses, so going to add a quick post to cover the scenario of having to maintain a fleet of vehicles.  Lets say they have to be serviced every month or 5000 miles, which ever occurs first.  I will split this into two sections, the first will cover the simple Date function and the second will give an overview of conditional formatting..
Once again, this post will just show the very basics, play about with your own data and ideas to discover more.

Section 1: Adding today's date to your sheet when it opens.
  • Open & format your new spreadsheet, pick a cell that you want to display the current date in and type =TODAY()    
  • When the spreadsheet is opened the selected cell will display the current date, as per your system clock.  This is seen below, where the cell B1 has =TODAY() inserted and displays the date.


So now we have the current date, we will add our data, I will just use the basic details for five vehicles as shown in the data set below..  With only five vehicles its pretty easy to see which vehicle needs the next service going by date alone.  Its a bit more difficult to identify which vehicle is coming close to doing 5000 miles since the last service and would be extremely difficult to arrange timely services for over 100 vehicles..


Section 2: Conditional Formatting based on cell values.
  • We will use this data set for simplicity:


  • Note: the current date on the top left and the date of last service in the right column..  We also have the current miles and last serviced miles recorded, so we can easily workout when the next service is due..  But, why not let Excel do the working out???  So by adding a column for how many miles to the next service and a column for how many days to the 4 week service is due (if the miles are low and we are going to service on days rather than miles).  
  • To workout the miles left, add 5000 to the last service and takeaway the current miles.  Use this formula:  =SUM((I3+5000)-F3)   where I3 holds the recorded miles of the last service and F3 holds the current miles on the vehile.  Note that if the vehicle has done more than 5000 miles since the last service it will show a negative number.  This is a true representation as can be read as -500 miles or 500 miles overdue...
  • To workout the days left, add 28 (for 4 weeks) to the date of the last service and takeaway the current date. Use:  =SUM((J3+28)-B1)   You could use  =SUM((J3+28)-TODAY())   to get the date on the fly, without having to reference the cell B1...
  • So here is the updated data set, as you can see it is a lot more User friendly in that we can see that the second vehicle is 1000 miles overdue its service and the last vehicle is due a service tomorrow. 


  • So, easy as that is now to see when services are due, we will add a bit of formatting to have the info stand out even more, again if working with over 100 vehicles, services could be missed just using this system ..

  • First we will check the miles and highlight as the vehicle gets close to 5000 miles from last service.  I will have 2 scales of when to alert the User, the first will be at say 500 miles left to the service.  This will inform the User that the service is due soon and should be booked etc.. The second alert will be at 200 miles, meaning it is time to get the vehicle serviced.   You can add as many alerts and at whatever miles you want.  I will also add an overdue highlight that will standout as the vehicle must get serviced asap..
  • To do this, highlight the cells containing the miles to the next service, click on Conditional Formatting & select New Rule, then from the new formatting rule, select format only cells that contain.  


  • As you can see, I have selected Cell Value, set it to less than or equal to, and set the value to apply the conditional formatting at 500.  Now set whatever formatting you want by clicking on the Format button.  
  • Now to set the 200 mile alert, just repeat the steps above (as for the 500 mile alert) but this time enter 200..  But make this one stand out a little more than the last, time is getting critical...
  • Now lets add a brazing highlight to show that a vehicle is overdue it service..  Again, you can add more levels here, as it may not be a real big deal if the vehicle is a couple of hundred miles over, but if 500 miles over it may break the rules of contract and should not be used..  So, again repeat the steps above and make it stand out..  See below:


  • As mentioned, the same can be done with the dates, why not play about with it yourself and try it...  Try things like highlighting the whole row and adding more alerts.
  • Note:  A good way to ensure you don't miss any is to carry out quick a sort on the column for miles to next service, this will show the vehicles ordered by when they are due their next service.  If you have vehicles allocated to teams or in order, just cancel the sort when you have the info you want..

Sunday, December 16, 2012

Add values only if a criteria is met (sumif)

In the Running Balance Sheet post, I said I would do a post to allow you to group outgoings.
So this post will cover that, aimed at a balance sheet.  I will create a simple balance sheet as in example 1 in the running balance sheet post, but will add a column for a category.  The category use a drop down list as explained in the last post - drop down list..  This will ensure the User enters the exact category in which a withdrawal is assigned to, it prevents misspelling and abbreviation which permits correct calculations on each category..
All we are going to do is sum as per normal, but add "if" and enter the category title, the function will then only sum the values of that specified category..  All really simple, so lets get started.

Example 1: Summing values of a specified category, in this post I will record exactly each step while creating the spreadsheet, as always there are more options to play with..

  • Open a new spreadsheet and add the titles in cells A3 through to E3, then bold (ctrl & b):  Date, Deposits, Withdrawals, Category & Comments
  • Now click on the the A column header and drag mouse to the E column header, this highlights all rows in these columns.  Now resize the columns by placing the mouse pointer between say B & C headers, click and drag to the right to make all columns wider..
  • Formatting the cells - highlight the cells B4 to say, C400 (I am only formatting to row 10 in this example), now right click and select Format, and format as "Accounting"..
  • In cell H3 type Cat 1, then right click on the lower right corner of the cell and drag down to cell H5, when released select the "Fill Series" from the pop up menu, now we have Cat 1 to Cat 5 in a list.
  • Click in cell D4 and click on the Data Tab, then Data Validation and list from the window that appears.  Now click in the "Source:" input box and then click on the cell H4 and drag to H7.  Now click OK and you will see a drop down icon next to cell D4...
  • Now click on the cell D4 & copy (ctrl & c), then select cells D5 to say D400 and paste (ctrl & v)..  These cells will all now have a drop down list with an absolute reference to our create list..
  • Now just populate the table with some data..
  • With the data entered, we can now calculate the Total cash out and the Running Total..  I have put the labels in cells D1 & D2, shaded them grey and added borders so it stands out.  
  • In cell E1 type: =SUM(C4:C400)  or just copy and paste this..  The Total Withdrawals is now displayed in cell E1..  
  • In cell E2 type: =SUM(B4:B400)-SUM(C4:C400)    or just copy and paste again..   The current balance is now displayed in cell E2..
  • So next we want to know how much was spent on each category... In this example, I will just use Cat 1 & Cat 2..  As above, put labels in cells A1 & A2, format as above..  
  • To calculate what was spent in Cat 1 use the sumif formula, so it is only adding if the category is Cat 1..  As you start to type sumif, excel will advise you of how the formula is made up..  Range is the where your Categories are named, Criteria is what you want to sum on, ie Cat 1, put this in quotes - "Cat 1"  and [sum_range] is where you want to calculate from, ie the Withdrawals column


  • Type or copy and paste the formula: =SUMIF(D4:D1400, "Cat 1",C4:C400)   This formula is looking in the cells D4 to D400 for the string "Cat 1", each time it finds a Cat 1 it will then look in the relative C column and add if there is a value.
  • To do the same for Cat 2, just copy the formula and change Cat 1 to Cat 2..
  • Note: When writing a formula, if you click in any cell it will map that cell to the formula, this has cause a lot of frustration to a lot of people that thought they could just click off the cell they are writing the formula in..  You cant without changing the formula, best either press enter or click on the green tick to left of the formula bar..


Drop Down List

Sometimes it best to limit the Users input to a dropdown list.  This will ensure each User enters data in the same format and same spelling, which will in turn facilitate with grouping, searching and totalling on a given value.  As always, I'll show the basics here, but when you working through the example you will notice that there are other options which you can add..

Example 1: Creating a Dropdown List
  • First you need to list the values you want to be used in your list.  This can be names of cities, Male / Female, age groups, vehicle types, anything...   Note this list can be placed anywhere, and that column can be hidden from the User, you can alter the list after it has been created, but remember to update the cells that the dropdown list uses..  In the Example, I have created the list in cells E2 to E7
  • If I want to limit the User input in the cell B2, Click on B2 and select the Data Tab at the top.
  • Now Click on Data Validation and select List from the dropdown list

  • Once you click on List, a Source input box will appear for you to enter the Source for the list.  Click in the Source input box and then select the cells that hold the data for the dropdown list.  This will create an absolute reference, which looks like:  =$E$2:$E$7   Note: the presence of the $ signs this is now a absolute reference..  This means the dropdown list created in the cell B2 can be copied and pasted to anywhere on the worksheet..  Without the $ signs it would be a relative reference, so copying the cell B2 to B20 will show a list made up of the values of E20 to E27.  Which, if you are recreating this example, will be an empty list.

Running Balance Sheet

Okay, there are many different ways and formats to achieve this, so I'll show two very simple methods that you can expand to your own needs.

The first way will have four columns, Date, Deposits, Withdrawals and Comments. The second will use three columns Date, Amount and Comments.  The second method will use negative values for withdrawals and positive values for deposits.  Both will show the current running total at the top..

Example 1: Two separate columns for Deposits and Withdrawals
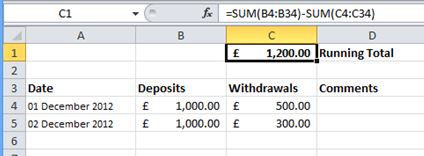
  • On the Balance Sheet, Click the cell you want to show the running total in.
  • Now add the Formula=SUM(B4:B34)-SUM(C4:C34)  Where B4:B34 are the cells to hold the Deposits, and C4:C34 are the cells to hold the Withdrawals.
  • Note: You should make a lot more cells available for the formula, you may have say 200 transactions per month, so instead of B34 & C34 use say, B300 & C300 


  • The above is not the cleanest way to calculate the running total, and gives no indication of how much was deposited or withdrawn..  So by simply calculating each column independently and displaying their running total and then calculating their totals will show much more information.  
  • The deposits total is calculated in cell B4 using:  =SUM(B6:B34)   
  • The withdrawals total is calculated in C4 using:  =-SUM(C6:C34)   Note: the minus sign before SUM, this will give the result a negative value as it is withdrawals
  • Now just carry out a normal SUM on these two cells and display the result in D2.  Now we have the current amount deposited, withdrawn and total all displayed.


To try any of the above, just copy and paste the formulas to the cells, ie, copy =SUM(B6:B34) and paste it into cell B4.  I have also formatted the cells to display £ and format the date, to do this Right Click on the cell and select Format Cells from the popup menu...


Example 2: Having Deposits and Withdrawals in the same column, using negative values for Withdrawals
  • Again, on the Balance Sheet, Click the cell you want to show the running total in, C2 in the screenshot below.
  • Now add the Formula=SUM(B4:B40)  Where B4:B40 are the cells to hold the Deposits, and Withdrawals.


I will build on this post later adding another column to allow the withdrawals to be grouped giving a running total for each category..


Saturday, December 15, 2012

An Overview of Formulas

If you have ever used Excel (or any spreadsheet for that matter) you will know that the real benefit over using the likes of a table in Word to store your data is the ability to use formulas.  Excel comes with a massive host of built in formulas for you to use..  To check these out just click on the Formula Tab and browse the many on offer, which will undoubtedly save you having to recreate complex ones.


I am not going to go into all the different types of formulas here, it would take too long and most are specific to a field such as financial, engineering or maths..

I will however, explain how to use Excel and a formula to calculate the year to year growth percent of say a countries GDP, your savings or a companies profit margin.

Example 1: Calculate Growth % in a fictitious company using Q2 & Q3 figures
  • The calculation is: Growth % = (Q3 - Q2) / Q2
  • So, to use this in Excel we will enter the figure for Q2 & Q3 in their respective cells
  • In the selected cell for the total (I have used A3) enter the formula =(A2-A1)/A1  where the cell A1 holds the data for Q2 and A2 holds the data for Q3.  
  • Note - to ensure a correct percentage right click on cell A3 and select Format Cells, now click on the Number Tab and set the cell to Percentage.


Try this and play about with the figures....

Filling cells quickly - Fill Series

Most will know know this, but you would be surprised how many people I have met that dont know how to drag and automatically fill cell values with anything from numbers to days of the week, months, etc..

Example 1: Filling a column with numbers

  • Type the first value in the required cell
  • Now Right Click on lower right of the cell containing the first value, the cursor icon will change to a narrow cross
  • Now Drag Down to the the amount you want to auto fill - Note if you want to fill a large number of cells, such as 31 for a month, then drag to a guess of 31.  More cells can be auto filled or even better take it past 31 and delete what is not required.
  • When you have covered all the required cells, Release The Right Click and you will be shown a popup menu
  • Now select Fill Series from the displayed menu and the cells will be auto filled
  • Note - the other options available, 
Copy Cells - does that, copies the value of the first cell into all cells selected.
Fill Formatting Only - again, as it says, if you want to quickly fill cells with the same formatting as the first, Fill Without Formatting - will fill the selected cells without copying the formatting of the first cell, Day, months etc will increment as Fill Series, but other values including numbers will not increment and just be copied..


Example 2: Filling a row with days of the week
  • Type the first value in the required cell, say Monday - Note that Days can even be abbreviated to Mon, Tue, etc.. 
  • Again Right Click on lower right of the cell containing the first value, and again, the cursor icon will change to a narrow cross
  • Now drag to the right for the the amount of days you want to auto fill - Again if you want to fill a large number of cells, such as 31 for a month, then drag to a guess of 31.  More cells can be auto filled or even better take it past 31 and delete what is not required.  
  • If creating several months of days and dates on one sheet, do check the dates and days are correct, the system only fills the series, if you put 31 days in a 30 day month, the rest of the dates and days will be out of sync..

Note: Excel will notice if you are creating an incremental list such as Big Test 1, Big Test 2 ...  Try it..

Overview

When you first open Microsoft Excel, you generally open a Workbook.  This contains worksheets which are denoted by tabs along the bottom, by default they are named sheet1, sheet2, etc..

Each sheet is made up of Cells which can be referenced by the letter along the top and the number down the side.  Example: Cell C6 is the third cell in and sixth down, A1 is the upper left most cell..

Just above the cells, normally from D onwards is the Formula Bar..   This is where you type in your formulas.

Example 1: if you want to add the contents of cells A1 & A2 and then show the total in cell A3, you would:

  • Click on cell A3 and type in the formula bar  =sum(A1+A2) 
Now the total of cells A1 & A2 will be shown in cell A3, even if you change the values of cells A1 or A2..  Keep it to numbers for now :)

Example 2: if you want to add the contents of cells A1 through to A5,  and then show the total in cell B1, you would:

  • Click on cell B1 and type in the formula bar  =sum(A1:A5) 
Again the total of cells A1 to A2 will be shown in cell B1.

Important: If you click on a cell and see a formula in the formula bar (such as =sum(A1:A5), do not type over it unless you know what you are doing....   
As in example 2, if you were to type, say 20 in B1 as that is the correct total, when the values of A1 to A5 change B1 will still show 20 as the total and may be wrong.  this is a very simple example, but very common that people start type in cells that contain formulas and then break the spreadsheet.

Always check the contents of the cell before entering data.  This is also a good way to learn formulas or see how the calculations are carried out.
Cells can be locked, but sometimes its not practical.  I may cover locked cells in a later post.. 

Disclaimer

Always, Always, Always back up your data before making changes....

So there we have the first tip, always back up your data, I will not be responsible if you type what you tink is the answer over a formula & then dont know how to get the formula back as the a total is not changing the way it used to...

This will bring me onto my next post very nicely..


Friday, December 14, 2012

Welcome

Hi, this is the first blog of what I aim to be a few..  My aim is to pass on some very simple Microsoft Excel tips & how to's.

This is mainly aimed at people that will have previously had little or no reason to use Excel.

These posts will not follow any particular learning curve as most books or sites will have the basics at the start and the more complex at the end.  I will just try to use real life examples of spreadsheets I have had to use in the past and try to show some helpful tips & tricks along the way.  However, I will aim to start very basic and try to keep it simple the whole way through.

If there are any specific areas you want covered, please post a comment and I'll try to cover them..

Many thanks for taking the time to read this, and hope some of the future posts will be of use to you..
BC